Before you is a piece of paper with the image: a) a triangle, b) a five-pointed star, c) a polygon in the shape of a floating swan. In every case come up with how to fold the sheet so that after that the corresponding figure can be cut out in one continuous straight cut with scissors.
prompt
In all cases, the solution almost entirely consists of two types of steps: you need to add either along the bisector of some of the angles associated with the figure (to "reduce" the number of segments not on one line), or along the perpendicular to one of the segments (to "fit »Its length to the desired one).
Solution
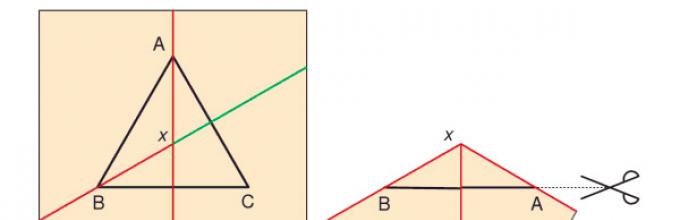
The figures below show how you need to add the shapes from the condition of the problem, so that you can then cut each of them with one cut.
With a triangle, everything is more or less clear: we add along one bisector, then - along the other (Fig. 1).

The star is pretty easy to deal with, too. First, you need to fold it in half along the axis of symmetry (a completely natural action - since you can "halve" the figure in one fell swoop). Then - combine the two rays of the star with each other, folding along the bisector of its "outer" angle. After that, only three segments will remain from the contour, which are already easy to combine (Fig. 2).

The swan is the hardest thing. This is understandable: a figure without symmetries, with a large number parties; therefore, a large number of folds will be required. The scheme according to which it is necessary to add is shown in Fig. 3. Simple dashed lines represent downward folds, dot-dash lines represent upward folds. First, you need to outline these folds separately so that the sheet takes on the shape of the roof of the house, and only then fold the sheet into a flat shape.
A series of photos shows the entire folding process:

Read about where such an ingenious system of folds comes from in the afterword.
Afterword
All the options offered in the condition are just special cases. general question which sounds like this:
Given a polygon on a flat sheet of paper, is it possible to fold this sheet so that the polygon can be cut with one straight cut?
It turns out that regardless of the shape of the polygon, the answer to this question is always yes: yes, you can. (Of course, we are now discussing this problem from the point of view of mathematics and do not touch on the "physical" side of the matter: too many times a sheet of paper cannot be folded. It is believed that even very thin paper cannot be folded more than 7-8 times. If you try, you can make 12 bends, but more is unlikely to work.)
Moreover, if several polygons are drawn, then the sheet can still be folded so that all of them could be cut with one cut (and nothing superfluous would be cut out). The point is that the following is true theorem:
Let an arbitrary graph be drawn on a sheet of paper. Then this sheet can be folded so that this graph can be cut with one cut, and nothing superfluous will be cut out.
This theorem has an algorithmic proof. That is, in its proof, an explicit recipe is given for how to build the required system of folds.
In short, the essence is as follows. First we have to build a straight skeleton. This is a set of lines - the trajectories of the vertices of the original polygon - along which they move when it is specially compressed. Compression works like this: we move the sides of the polygon "inward" with constant speed so that each side moves without changing its direction. As you can easily see, at first the vertices will crawl along the bisectors of the corners of the polygon. That is, this seemingly strange construction simply generalizes the idea suggested in the tooltip: that one should try to add along the bisectors of the corners of the polygon. Note that in the process of compression, the polygon can "fall apart" into parts, as it happened in Fig. 5.

After the skeleton is obtained, from each of its vertices, you need to draw rays perpendicular to those sides of the original figure to which they can be drawn. If the ray hits a line from the skeleton, then after crossing it should continue not straight, but along its mirror image relative to this line. The fold system consists of drawn lines.
For more information on this and how to determine the direction of the fold ("up" or "down"), see the article E. D. Demaine, M. L. Demaine, A. Lubiw, 1998. Folding and Cutting Paper. A brief history and another approach to solving the problem can be found on the page of Eric Demain, one of the authors of the proof of the theorem. You can also read a slightly more popular story about this theorem (unfortunately, also in English). And finally, I advise you to watch the cartoon "Mathematical Etudes", which perfectly shows how you need to fold a triangle and a star, so that you can then cut them out in one cut.
Finally, I would like to note that issues similar to those discussed above have been raised for quite some time. For example, in a Japanese book of 1721, as one of the tasks, readers were asked to cut out a figurine of three united rhombuses in one cut (Fig. 6). Later, the famous illusionist Harry Houdini explained the method of carving a star in his book. By the way, according to legend, just due to the fact that such a star can be quickly cut out of paper or fabric, now we see five-pointed stars on the US flag: seamstress Betsy Ross, who, according to legend, sewed the first flag, was able to convince George Washington that they are better used for the flag than the six-pointed ones that Washington originally wanted to use.

Photoshop offers almost limitless creative possibilities. However, users who are just starting to work with the program may have difficulty in the most elementary, for example, drawing geometric shapes. Most often, difficulties occur just when you need to draw a triangle. In fact, everything is simple here, and we will figure out how to do it.
How to draw a triangle in Photoshop
Examining the left panel with tools, especially the tools that allow you to draw geometric figures, the user will not find the triangle icon. There are squares, ellipses, polygons, etc., but no triangles. And drawing a triangle just happens with the "Polygon" tool.

You can also draw a triangle using the Straight Lasso tool, although this option for creating geometric shapes is not so obvious. It is done as follows:

As you can see, there is nothing difficult about creating a triangle. Similar patterns can be used to make other geometric shapes that contain multiple angles. If this article turned out to be useful to you, share it with other people, perhaps it will be useful to them too.
In this article, you will learn how to paint in Photoshop. different types triangle: equilateral, isosceles, versatile and rectangular.
How to draw an equilateral triangle
In an equilateral triangle, all three sides are equal.
The easiest way to draw such a triangle in Photoshop is using the Polygon tool.
Select this tool and in the settings panel immediately specify the number of sides - 3.
The next step is to decide what the future triangle should be: a vector shape, raster with a solid fill, or only a contour is needed. Consider all options.
Vector triangle
In the options bar, select the option Shape layer.

Now you can draw the triangle itself. During creation, you will see its boundaries. This is necessary in order to calculate its dimensions. Also, until you release the mouse button, you can twist it.

The good thing about a vector triangle is that you can quickly change its color, as well as painlessly resize it without losing quality. To do this, call the command - Ctrl + T.
To later turn it into a raster triangle, use the command.
Raster triangle with solid fill
You will get the same triangle as in the example above, but it will be immediately in the raster.
To do this, on the parameters panel, select the setting Fill pixels.
Before creating such a triangle, you must first.
Now draw a shape and it will be like the most common bitmap element.

How to draw the outline of an equilateral triangle
For such a shape, select the option in the options bar. Contours.

Draw a triangle. You, of course, will only get its outline. Next, with the same tool selected, right-click inside the path. A context menu will appear. Select a team Form selection.

A dialog box will open. Leave the Feather Radius at 0. Click OK.

As a result, we made it out of the contour.

To do this, run the command Editing - Stroke... A window will appear in which you specify the thickness of the stroke line, as well as how it will pass relative to the dotted selection line: inside, center, outside.

Photoshop made a stroke, now remove the dotted line of the selection so that it does not interfere - Ctrl + D. Result:

How to draw an isosceles triangle
An isosceles triangle has two sides equal.
Let's look at an example when you need to draw isosceles triangle given sizes. Let's say the base is 300 pixels and the height is 400 pixels.
Ready
An isosceles triangle is drawn according to the given dimensions!
 In a right-angled triangle, one of the angles is 90 degrees.
If you need a right-angled triangle with predetermined dimensions, for example, the dimensions of the legs are 200 and 300 pixels, then the easiest way is to do as follows:
Step 1
Create a new document in Photoshop with the same height and width as the legs: for example, let's say the width is 300 pixels and the height is 200 pixels.

The working area in Photoshop is always rectangular, so an angle of 90 degrees will already be provided. The two sides of the rectangle are its legs. It remains only to draw a diagonal - this will be the hypotenuse.
Step 2
We will proceed by analogy with the example above. We take the tool Line and set the option Shape layer.
Now draw a line around the edges and connect two points diagonally:

Step 3
There are again three shape layers on the layers palette. They can be combined into one layer (command Merge layers).
Ready
The rectangular triangle is ready, you can paint over it in some color:

If you spot an error in the text, select it and press Ctrl + Enter. Thanks!
Several impossible figures were invented - a ladder, a triangle and an x-prong. These figures are actually quite real in the volumetric image. But when the artist projects the volume onto paper, the objects seem impossible. The triangle, which is also called the "tribar", has become a wonderful example of how the impossible becomes possible when you make an effort.
All these figures are beautiful illusions. Achievements of human genius are used by artists who paint in the style of imp-art.
Nothing is impossible. This can be said about the Penrose triangle. It is a geometrically impossible figure whose elements cannot be connected. After all, the impossible triangle became possible. Swedish painter Oskar Reutersvärd in 1934 presented the world with an impossible triangle made of cubes. A. Reutersvärd is considered to be the discoverer of this visual illusion. In honor of this event, this drawing was later printed on a Swedish postage stamp.
And in 1958 the mathematician Roger Penrose published a publication in English magazine about impossible figures. It was he who created the scientific model of illusion. Roger Penrose was an incredible scientist. He conducted research in the field of the theory of relativity as well as fascinating quantum theory. He was awarded the Wolf Prize together with S. Hawking.
It is known that the artist Maurits Escher, impressed by this article, painted his amazing work - the lithograph "Waterfall". But is it possible to make a Penrose triangle? How to do it, if possible?
Tribar and reality
Although the figure is considered impossible, making a Penrose triangle with your own hands is easier than ever. It can be made out of paper. Origami lovers simply could not ignore the tribar and still found a way to create and hold in their hands a thing that seemed previously an outrageous fantasy of the scientist.
However, we are deceived by our own eyes when we look at the projection of a three-dimensional object of three perpendicular lines. It seems to the observer that he sees a triangle, although in reality it is not.
Geometry of the craft
The tribar triangle, as said, is not actually a triangle. The Penrose triangle is an illusion. Only at a certain angle does the object look like an equilateral triangle. However, an object in its natural form is 3 faces of a cube. On such an isometric projection, 2 angles coincide on the plane: the near one from the viewer and the far one.

Optical illusion, of course, is quickly revealed, as soon as you pick up this object. And the shadow also reveals the illusion, since the shadow of the tribar clearly shows that the angles do not coincide in reality.
Tribar made of paper. Schemes
How to make a do-it-yourself Penrose triangle out of paper? Are there any schematics for this model? To date, 2 landmarks have been invented in order to fold such an impossible triangle. The basics of geometry tell you exactly how to fold an object.
To fold the Penrose triangle with your own hands, you will need to allocate only 10-20 minutes. You need to prepare glue, scissors for several cuts and the paper on which the diagram is printed.

From such a blank, the most popular impossible triangle is obtained. Origami craft is not too difficult to make. Therefore, it will definitely work the first time, and even for a student who has just begun to study geometry.

As you can see, it turns out a very nice craft. The second piece looks different and folds differently, but the Penrose triangle itself looks the same in the end.
Stages of creating a Penrose triangle from paper.
Choose one of 2 templates convenient for you, copy the file and print. Here is an example of a second layout model, which is a little easier to perform.

The template for origami "Tribar" itself already contains all the necessary tips. In fact, no schematic instruction is required. It is enough just to download it onto a thick paper medium, otherwise it will be inconvenient to work and the figure will not work. If you cannot immediately print on cardboard, then you need to attach a sketch to the new material and cut the drawing along the contour. For convenience, can be stapled.
What to do next? How to fold the Penrose triangle with your own hands in stages? You need to follow this plan of action:
- We aim reverse side scissors the lines where you need to bend, according to the instructions. Bend all the lines
- We make cuts where necessary.
- We glue with the help of PVA those shreds that are intended for fastening the part into a single whole.
The finished model can be repainted in any color, or you can take colored cardboard for work in advance. But even if the object is made of white paper, all the same, everyone who enters your living room for the first time will certainly be discouraged by such a craft.
Drawing of a triangle
How to draw a Penrose triangle? Not everyone loves to do origami, but many people love to draw.
To begin with, an ordinary square of any size is depicted. Then a triangle is drawn inside, the base of which is the lower side of the square. A small rectangle fits into each corner, all sides of which are erased; only those sides remain that are adjacent to the triangle. This is necessary to keep the lines straight. It turns out a triangle with truncated corners.
The next step is to display the second dimension. A strictly straight line is drawn from the left side of the upper lower corner. The same line is drawn, starting from the lower left corner, and is slightly not brought to the first line of the 2nd dimension. Another line is drawn from the right corner, parallel to the underside of the main shape.

The final stage - inside the second dimension, the third is drawn with the help of three more small lines. Small lines start from the lines of the second dimension and complete the image of the three-dimensional volume.
Other Penrose figures
By the same analogy, you can draw other figures - a square or a hexagon. The illusion will be respected. But still, these figures are no longer so amazing. These polygons just appear to be highly twisted. Modern graphics allow you to make more interesting versions of the famous triangle.

In addition to the triangle, the Penrose staircase is also world famous. The idea is to deceive the eyes, when it seems that a person rises continuously upward when moving clockwise, and if it moves counterclockwise, then down.
The continuous staircase is best known for its association with M. Escher's painting "Ascent and Descent". It is interesting that when a person passes all 4 flights of this illusory staircase, he invariably ends up where he started from.
Other objects are known to mislead the human mind, such as the impossible bar. Or a box made according to the same laws of illusion with intersecting edges. But all these objects have already been invented on the basis of an article by a remarkable scientist - Roger Penrose.
Impossible triangle in Perth
The figure, named after the mathematician, is honored. A monument has been erected to her. In 1999, in one of the cities of Australia (Perth), a large aluminum Penrose triangle was installed, which is 13 meters high. Tourists take pictures with pleasure next to the aluminum giant. But if you choose a different angle of view for the photo, then the deception becomes obvious.
When I was a “teapot”, I was faced with the need to draw a triangle in Photoshop. Then I could not cope with this task without outside help.
It turned out that everything is not as complicated as it might seem at first glance. In this tutorial I will share with you my experience in drawing triangles.
There are two (known to me) ways.
The first method allows you to draw an equilateral triangle. For this we need a tool called "Polygon"... It is located in the Shapes section on the right toolbar.

This tool allows you to draw regular polygons with a specified number of sides. In our case, there will be three of them (sides).

After adjusting the fill color

place the cursor on the canvas, hold down the left mouse button and draw our shape. During the creation process, the triangle can be rotated without releasing the mouse button.

The result is:

Alternatively, you can draw a shape with no fill, but with an outline. Contour lines are adjusted in the upper toolbar. The fill is also configured there, or rather its absence.

I got triangles like this:

You can experiment with the settings to achieve the desired result.
The next tool for drawing triangles is "Straight lasso".

This tool allows you to draw triangles in any proportion. Let's try to draw a rectangular one.
For right triangle we need to accurately draw a straight (who would have thought ...) angle.
Let's use the guides. How to work with guide lines in Photoshop, read this article.
So, we have read the article, we are pulling the guides. One vertical, the other horizontal.

To make the selection "pull" to the guides, turn on the snapping function.


Then right-click inside the selection and select, depending on your needs, the context menu items "Run Fill" or Stroke.
The fill color is configured as follows:

For strokes, you can also adjust the width and position.

We get the following results:
Fill.


To receive sharp corners you need to stroke "Inside".
After deselection ( CTRL + D) we get a finished right-angled triangle.

These are the two simplest ways to draw triangles in Photoshop.